Build LMS platform from scratch. Part 4 — Set up CI/CD.
In this part, we will cover the creation of pipelines and continuous delivery for our Learning Management System. Having an actual release environment and checking each change for errors is necessary for such applications.
To begin with, I created a GitHub repo containing the code. The link to it is https://github.com/ExuCounter/lernado.
I named the project Lernado — a learning experience that goes as fast as a tornado and I hope the development of this project will be fast like that :D
For the tech stack, I bootstrapped Remix + React for the front end and Elixir + Phoenix for the back end, as mentioned in my previous article. If you have not checked previous articles I strongly recommend to do so.
Next, I created two Dockerfiles: one for each side. I based them primarily on the official tutorials (frontend / backend) and made a few adjustments along the way. The latest versions are available here:
With the ability to run our processes inside the containers, I created a docker-compose file that can run them side by side:
services:
  db:
    image: postgres:17
    restart: always
    environment:
      POSTGRES_USER: postgres
      POSTGRES_PASSWORD: postgres
      POSTGRES_DB: dev
    ports:
      - "5432:5432"

  backend:
    build: ./backend
    depends_on:
      - db
    environment:
      DATABASE_URL: "postgres://postgres:postgres@db/dev"
      SECRET_KEY_BASE: "09wFngCQBx823enH6DyF5idFNJj1ggbyD+ebyj2bicPIsppr5QekFGnvfivY+5IU"
    ports:
      - "4000:4000"

  frontend:
    build: ./frontend
    depends_on:
      - backend
    ports:
      - "3000:3000"
    environment:
      API_URL: "http://backend"
It’s beneficial to see the overall picture of the processes you want to run and the required variables for an isolated environment. This approach also helps me when the app needs to be tested in a production-like environment via only one command: docker-compose up
Continuous integration
With this knowledge, we’re ready to set up a CI pipeline in GitHub Actions. To support our basic needs, I created two parallel processes: one for the server side and one for the client side:
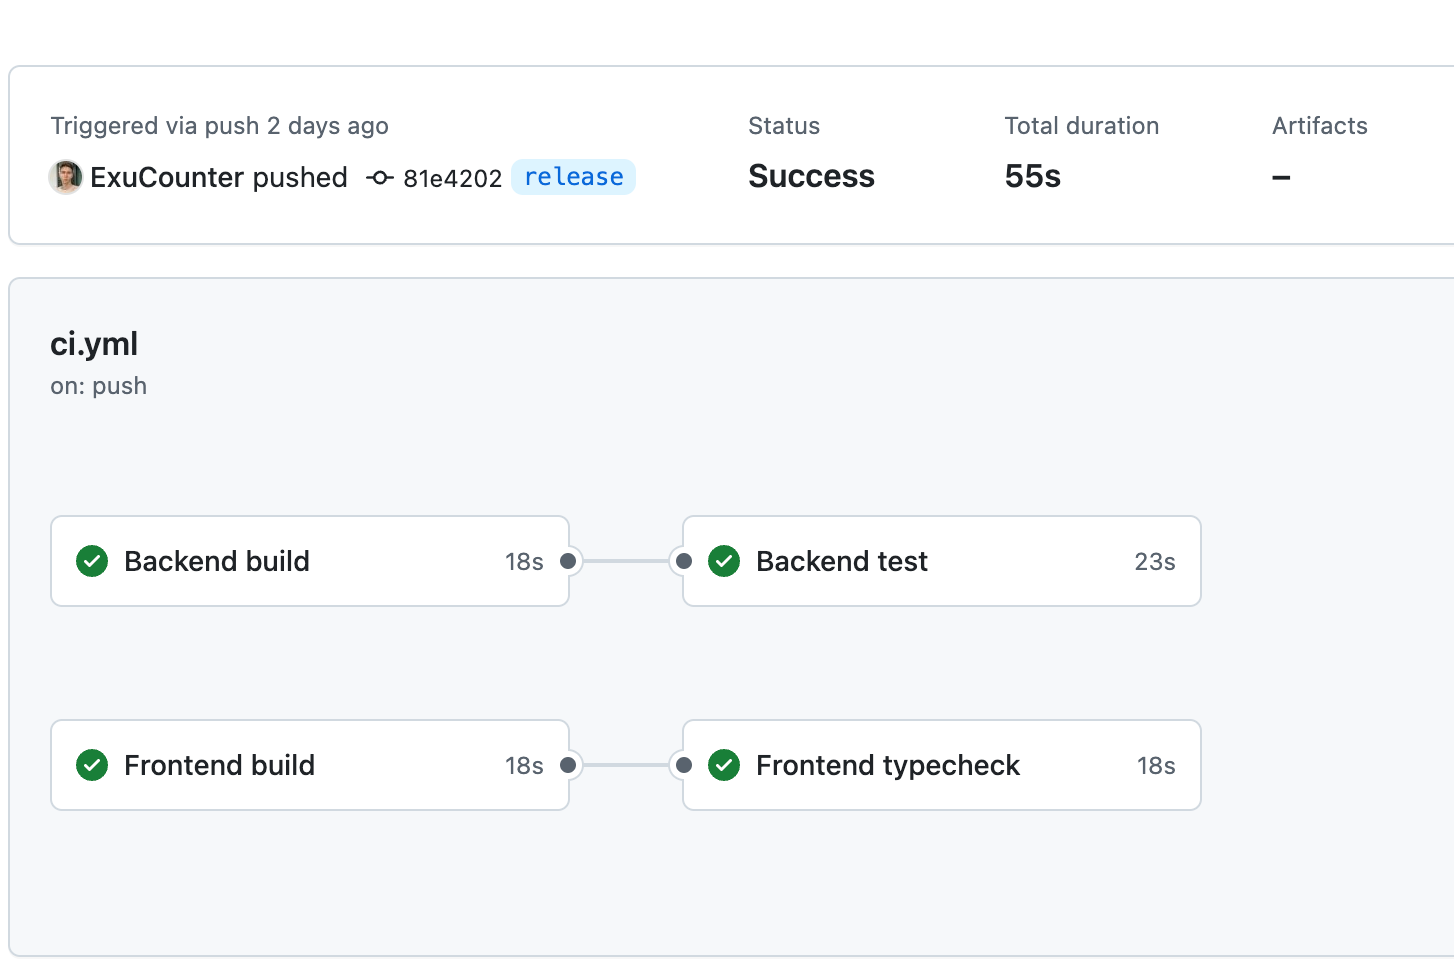
What they do first — is trying to build the Dockerfiles. Once the build process is complete, the actual check is triggered. For the back end, I run tests, and for the front end, I perform type-checking of the client-side code.
You can see that the speed of the execution is lightning (55sec full pipeline) because I added a reusable cache for dependencies management:
- Frontend
- name: Restore dependencies cache
  uses: actions/cache@v4
  with:
    path: backend/deps
    key: ${{ runner.os }}-mix-${{ hashFiles('backend/mix.lock') }}
    restore-keys: ${{ runner.os }}-mix-

- name: Restore build cache
  uses: actions/cache@v4
  with:
    path: backend/_build
    key: ${{ runner.os }}-elixir-build-${{ hashFiles('backend/mix.exs', 'backend/mix.lock', 'backend/config/**/*', 'backend/lib/**/*') }}
restore-keys: ${{ runner.os }}-elixir-build-- Backend
- name: Restore dependencies cache
  uses: actions/cache@v4
  with:
    path: frontend/node_modules
    key: ${{ runner.os }}-node-modules-${{ hashFiles('frontend/package-lock.json') }}
    restore-keys: |
      ${{ runner.os }}-node-modules-
This cache checks whether the contents of certain files have changed (typically it’s lock files). If they don’t, we can reuse the cache from the previous build. More information about cache reusing is here: https://docs.github.com/en/actions/writing-workflows/choosing-what-your-workflow-does/caching-dependencies-to-speed-up-workflows
And the full CI workflow file you can find here: https://github.com/ExuCounter/lernado/blob/main/.github/workflows/ci.yml
Continuous delivery
For continuous delivery we will need two things:
-
Set up an AWS account and several AWS services (from the experience the whole bunch of services will cost approximately $40–50 per month). If you don’t use the services, you can shut them down at any time.
-
GitHub workflow which will build and push our docker images to the registry and start a new task.
To start with AWS I logged into my account as a root user and created the following resources:
-
Elastic Container Registry — a place for managing our docker images. It will be automatically used by the GitHub workflow to store new image versions for each release. Guide: https://docs.aws.amazon.com/ecr/
-
ECS (Elastic Container Service) Cluster — Definition of the infrastructure where our tasks and services run. I chose everything by default. Guide: https://docs.aws.amazon.com/AmazonECS/latest/developerguide/create-cluster-console-v2.html
-
ECS (Elastic Container Service) Service — A place where we can run our future tasks. Here you specify how you want to run your process, what strategy you want to apply (for example, rolling updates), and how many tasks (replicas) you want running at the same time. Guide: https://docs.aws.amazon.com/AmazonECS/latest/developerguide/create-service-console-v2.html

- ECS (Elastic Container Service) Task Definition — Defines how containers should run in the service. You can think about this section as a docker-compose file. Guide: https://docs.aws.amazon.com/AmazonECS/latest/developerguide/task_definitions.html. Below I listed what configuration of our containers looks like:
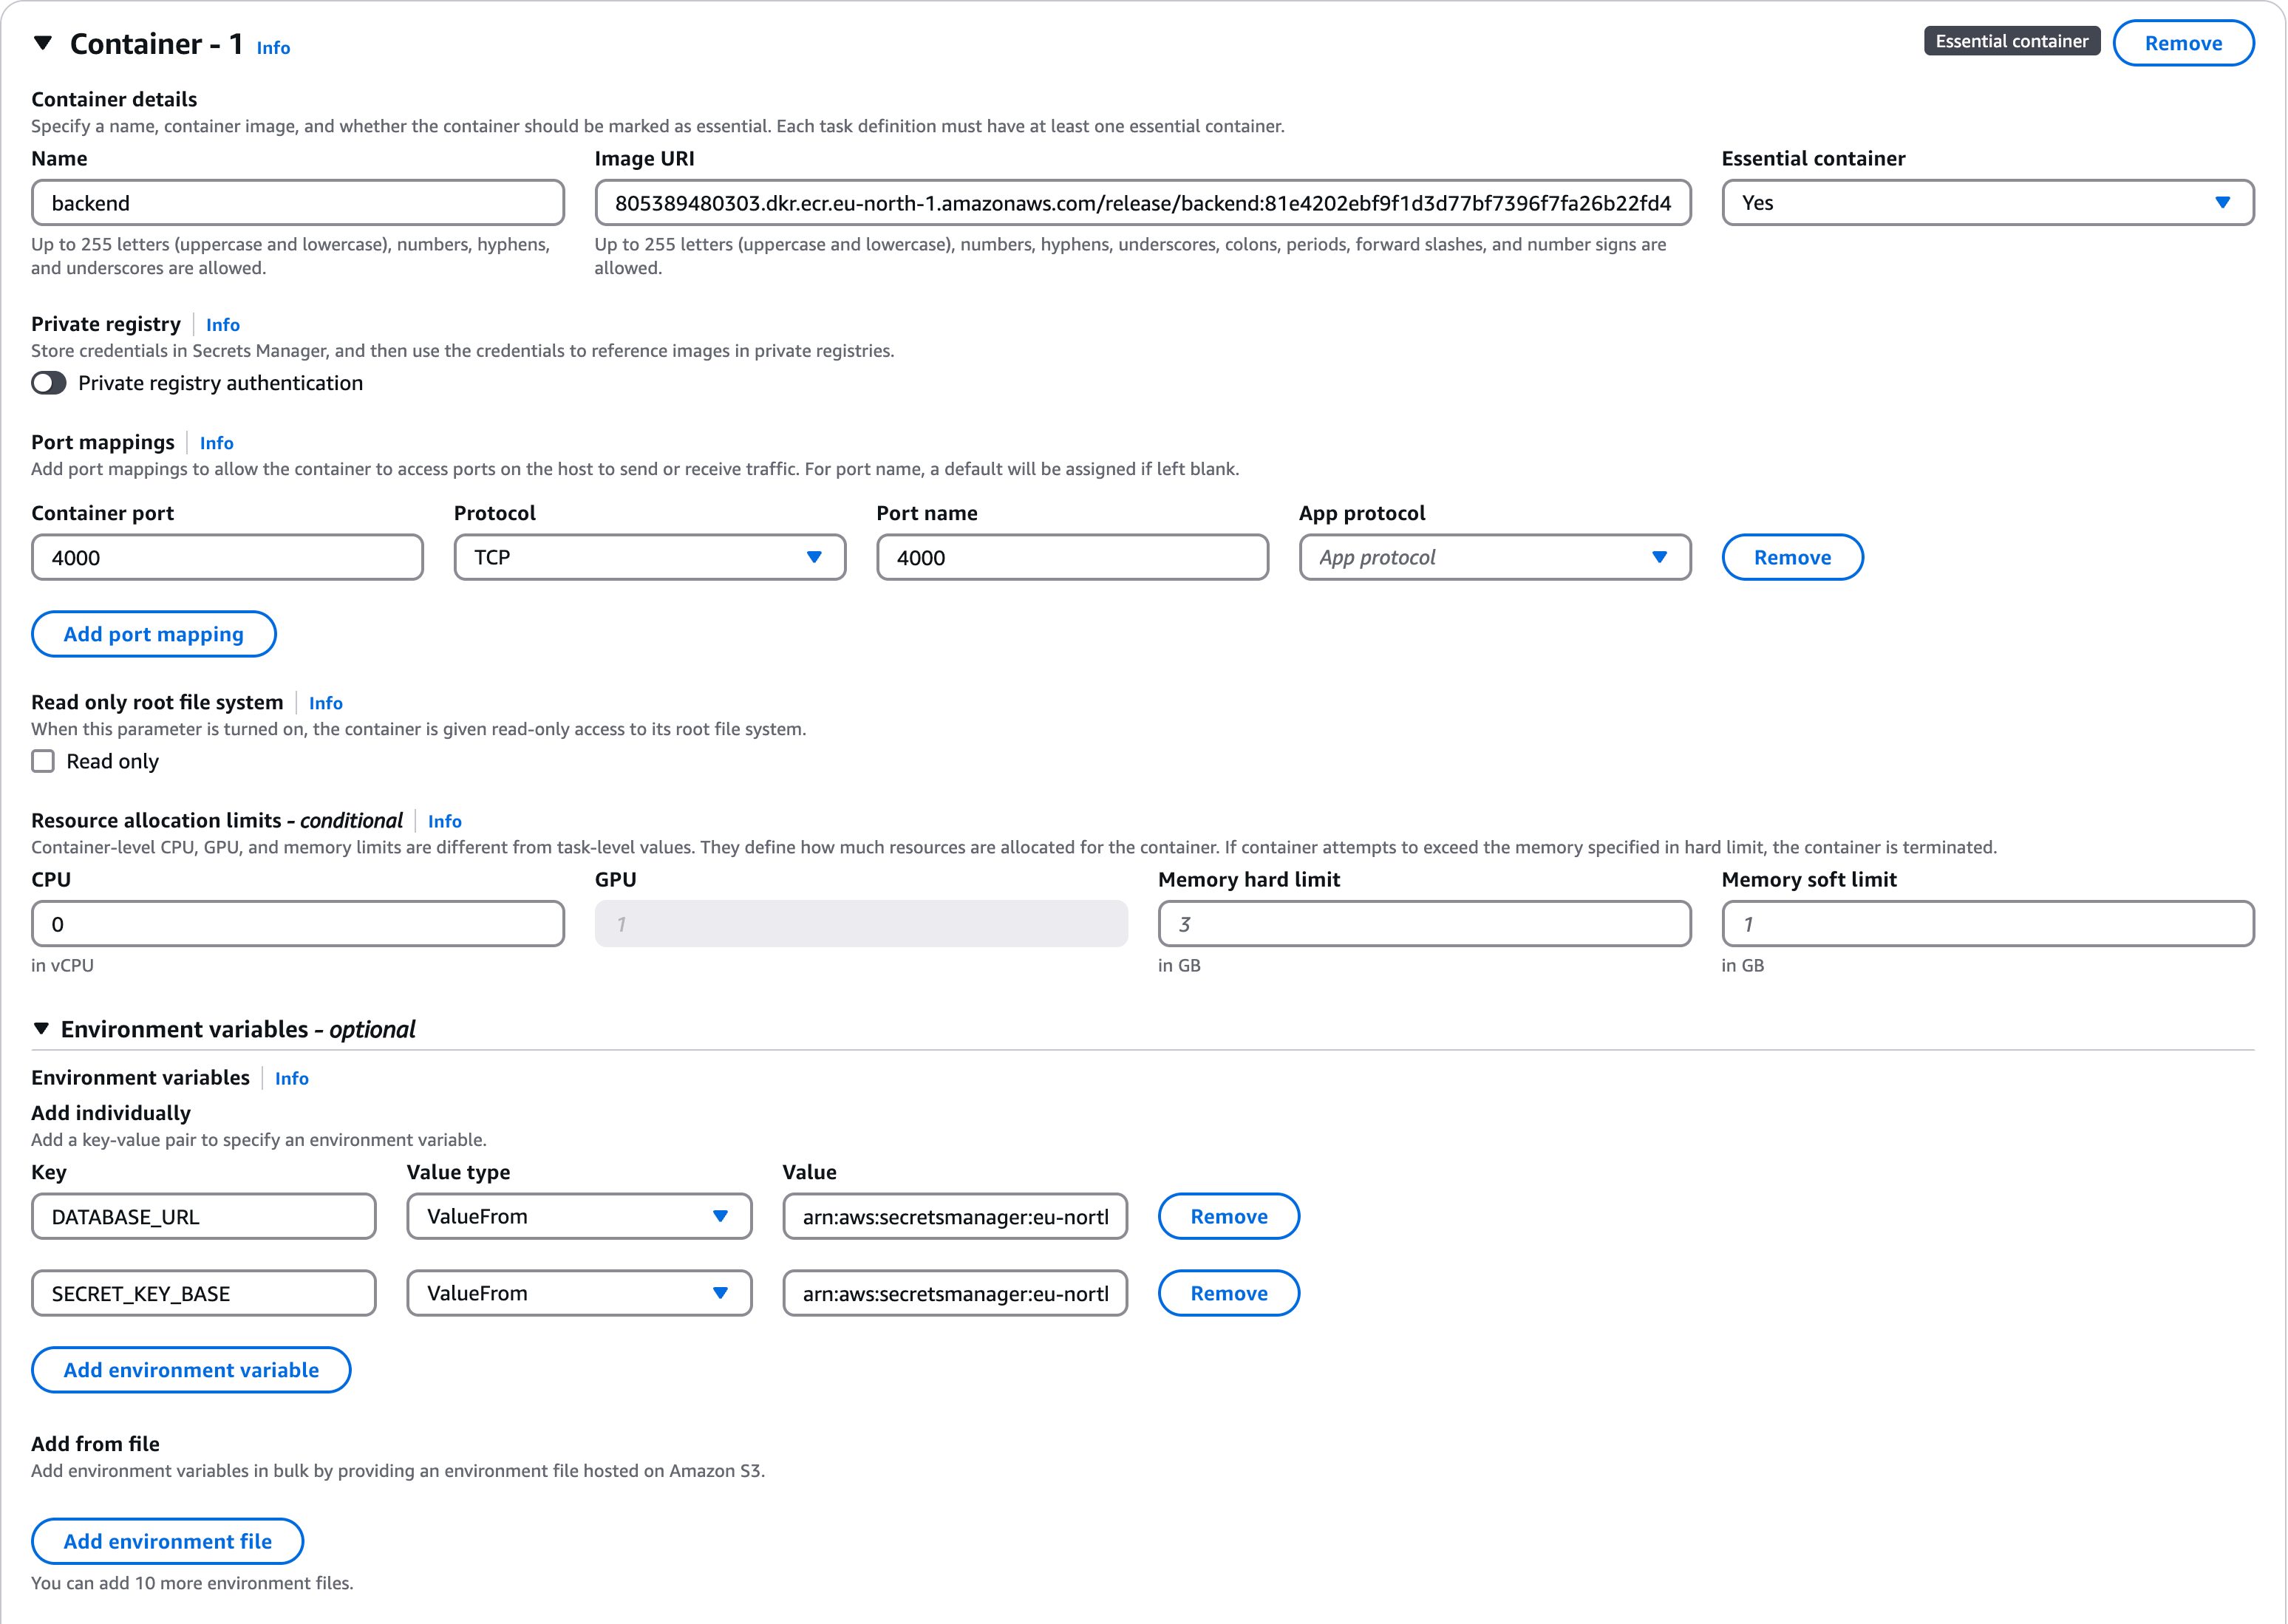
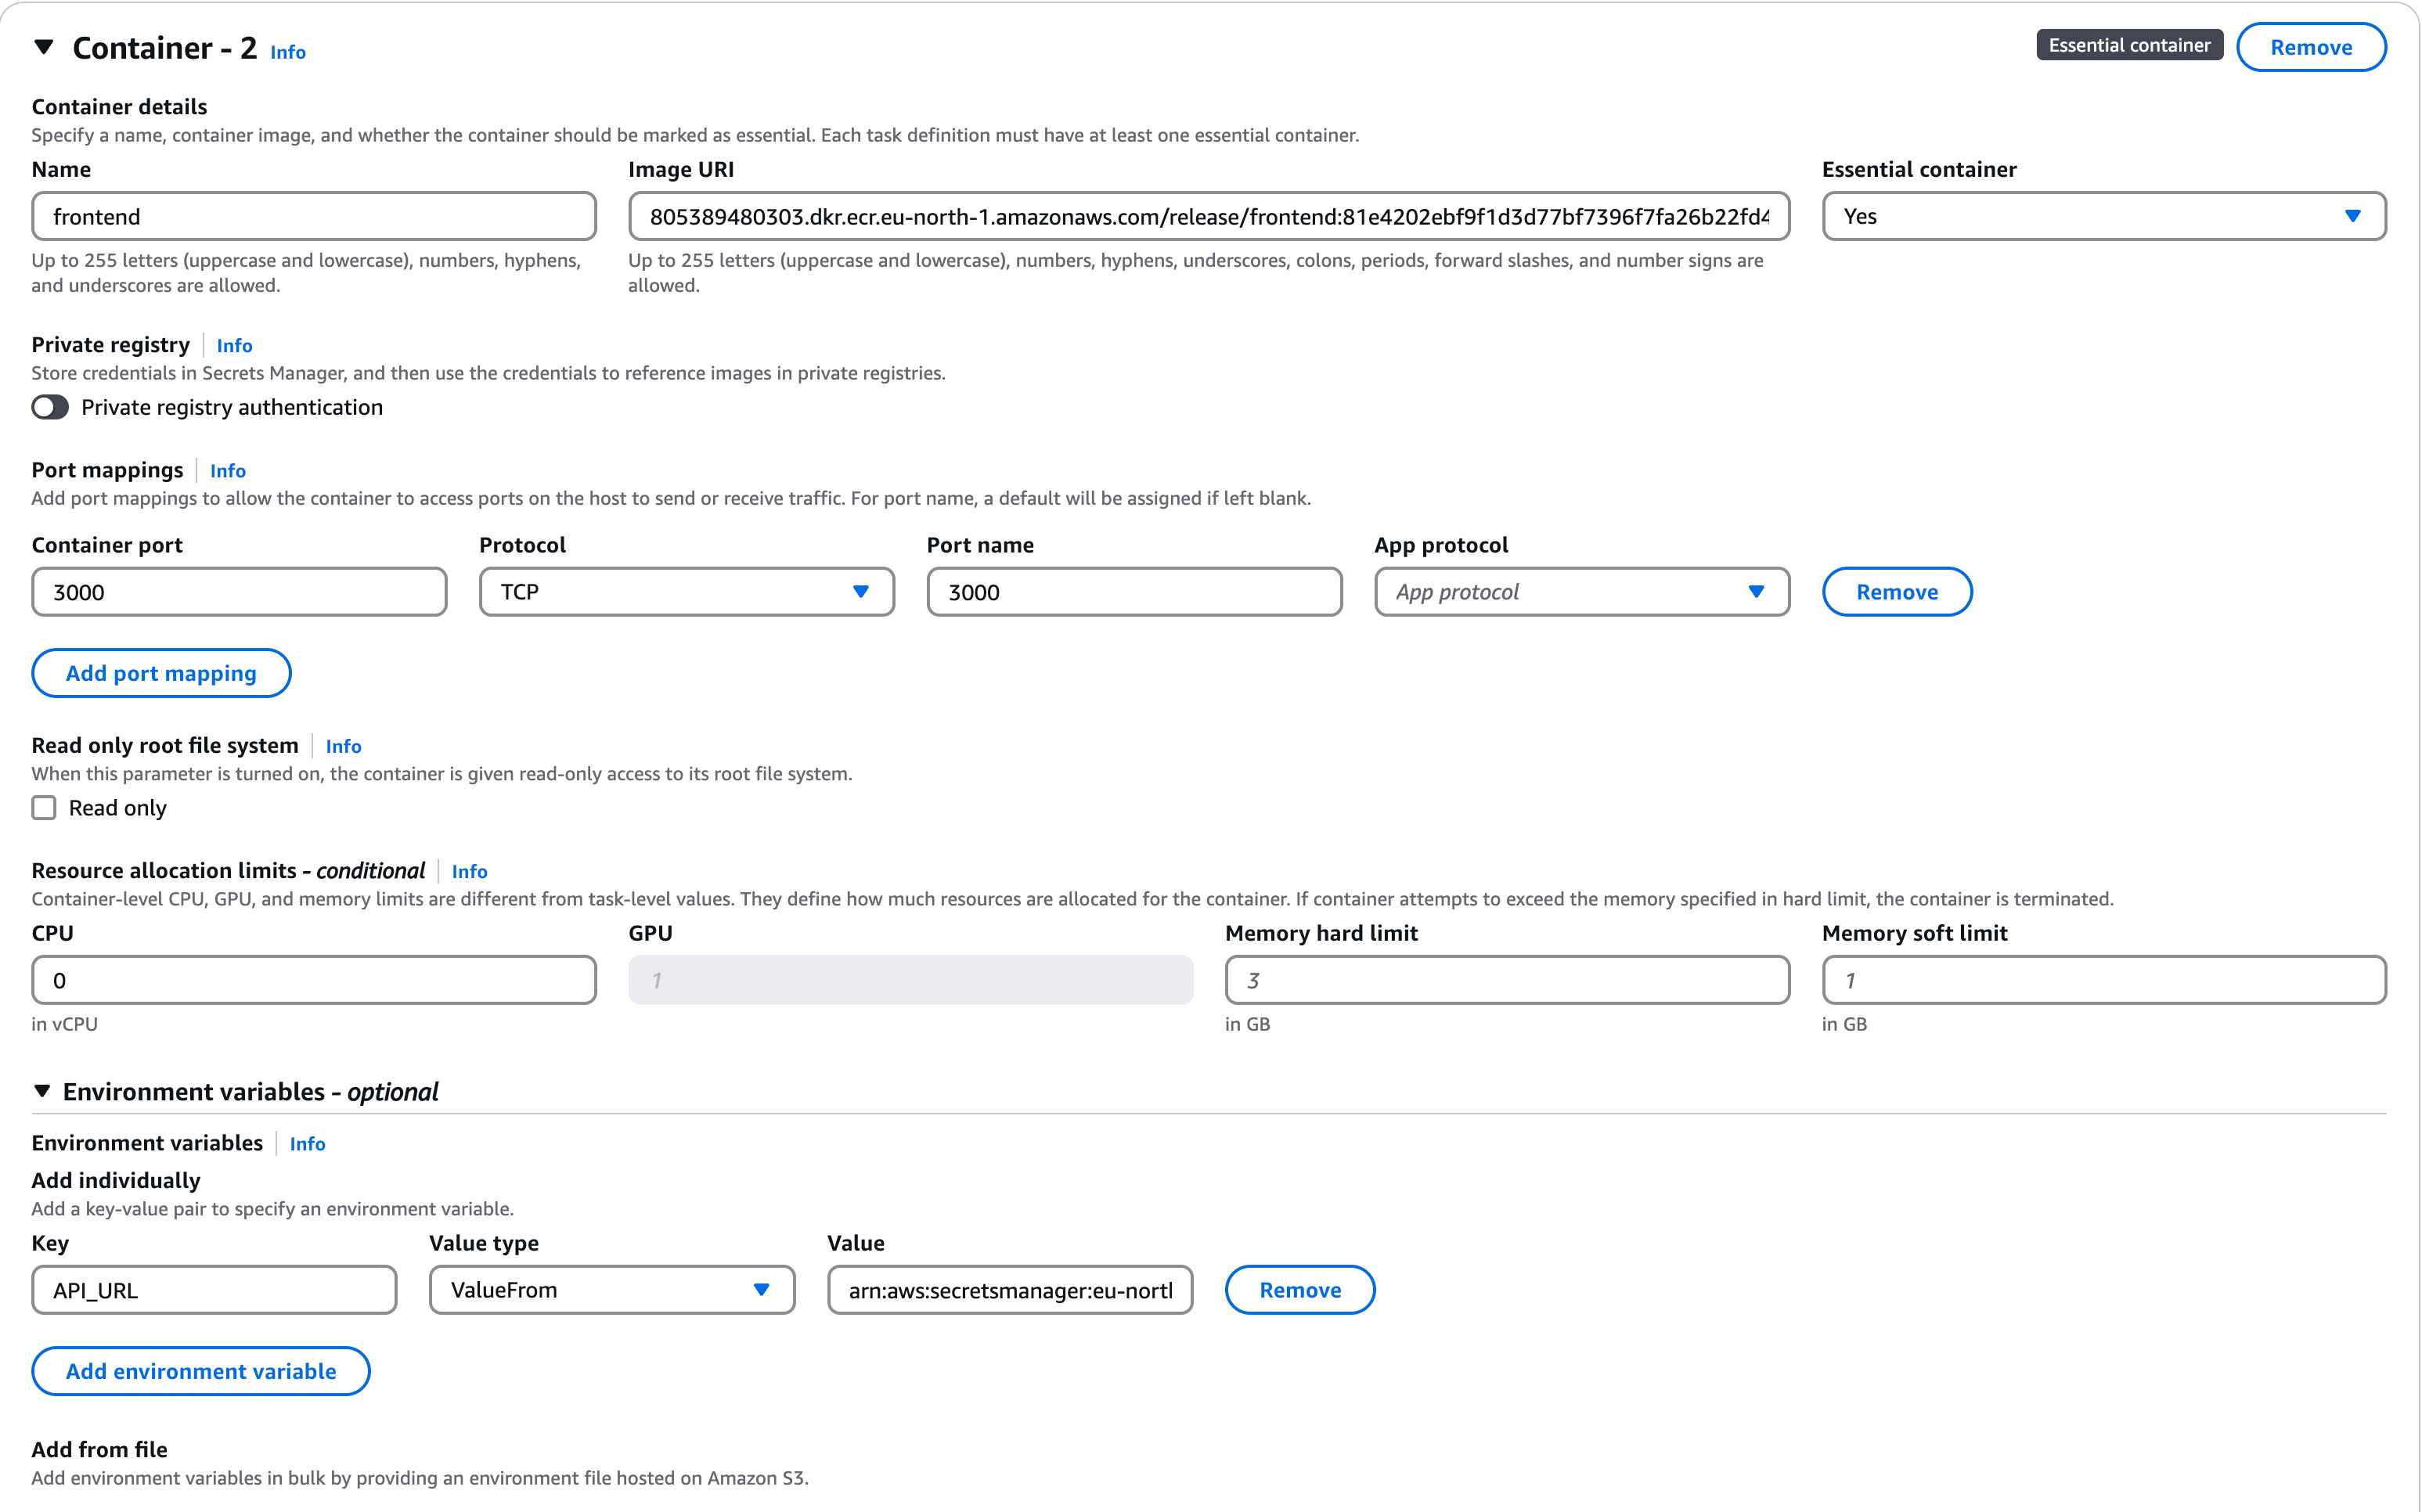
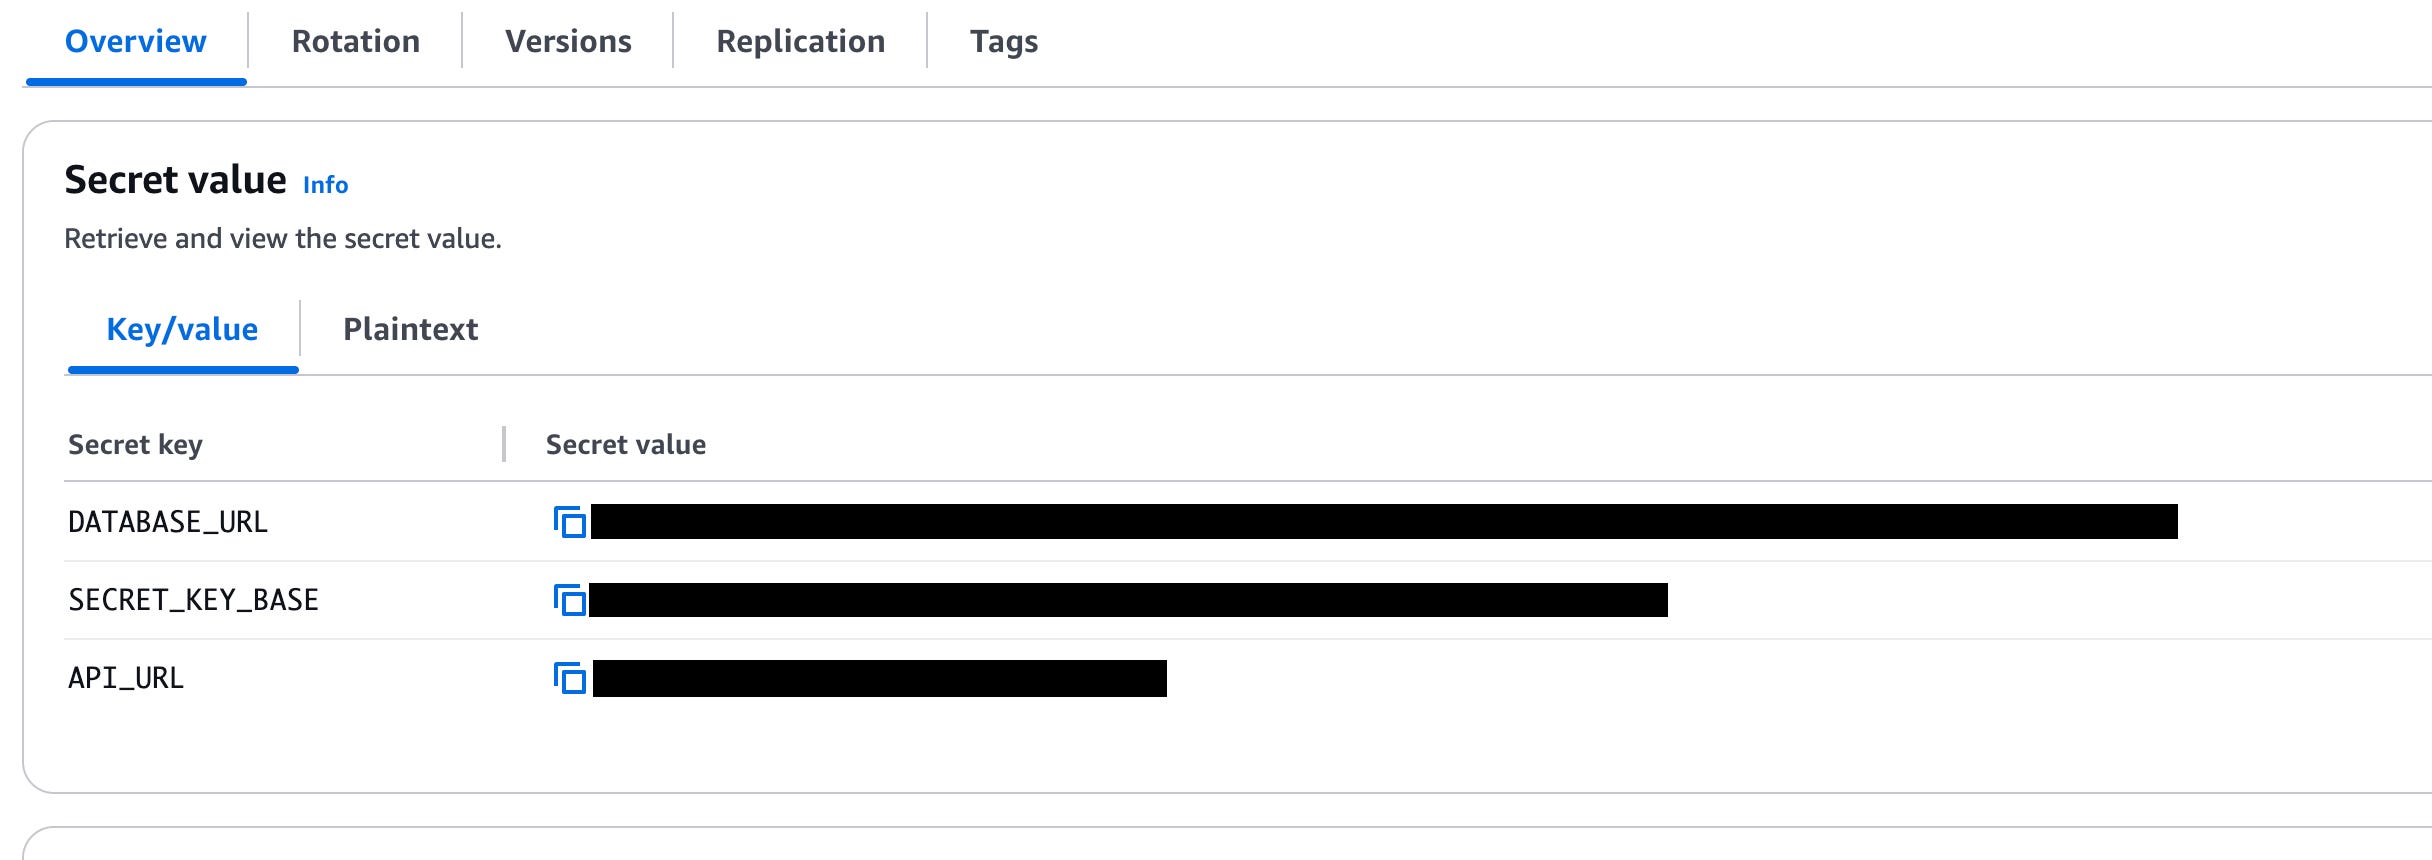
- Secrets Manager — Stores sensitive data securely. In our case, data related to the backend and frontend containers and their communication style. Guide: https://docs.aws.amazon.com/secretsmanager/latest/userguide/managing-secrets.html
- Application Load Balancer — I used it just to receive an address in the public network (DNS name) because the Fargate instance does not provide it by default. But of course, you can use it to distribute user flow properly across the available resources. Guide: https://docs.aws.amazon.com/elasticloadbalancing/latest/application/application-load-balancer-getting-started.html

-
Virtual Private Cloud — Provides network isolation. If you want to restrict some IP addresses for reaching resources, this is the most suitable place to do it. Guide: https://docs.aws.amazon.com/vpc/
-
RDS (Relational Database Service) — Manages our SQL database. From the cool features that you can do: rotation of creds in the database using the secrets manager above; backups every N-days automatically; customize access via the virtual private cloud. Guide: https://docs.aws.amazon.com/AmazonRDS/latest/UserGuide/CHAP_GettingStarted.html. Also, instead of RDS, you could create a container inside ECS along with backend and frontend containers, and then your database would be overwritten every time you create a new task in ECS. It is useful for example for temporary test environments where you don’t want to store data constantly.
CD Github workflow
After AWS’s successful configuration, I took a third-party GitHub workflow for AWS deployments and it looked like great instruction:
# This workflow will build and push a new container image to Amazon ECR,
# and then will deploy a new task definition to Amazon ECS, when there is a push to the "main" branch.
#
# To use this workflow, you will need to complete the following set-up steps:
#
# 1. Create an ECR repository to store your images.
#    For example: `aws ecr create-repository --repository-name my-ecr-repo --region us-east-2`.
#    Replace the value of the `ECR_REPOSITORY` environment variable in the workflow below with your repository's name.
#    Replace the value of the `AWS_REGION` environment variable in the workflow below with your repository's region.
#
# 2. Create an ECS task definition, an ECS cluster, and an ECS service.
#    For example, follow the Getting Started guide on the ECS console:
#      https://us-east-2.console.aws.amazon.com/ecs/home?region=us-east-2#/firstRun
#    Replace the value of the `ECS_SERVICE` environment variable in the workflow below with the name you set for the Amazon ECS service.
#    Replace the value of the `ECS_CLUSTER` environment variable in the workflow below with the name you set for the cluster.
#
# 3. Store your ECS task definition as a JSON file in your repository.
#    The format should follow the output of `aws ecs register-task-definition --generate-cli-skeleton`.
#    Replace the value of the `ECS_TASK_DEFINITION` environment variable in the workflow below with the path to the JSON file.
#    Replace the value of the `CONTAINER_NAME` environment variable in the workflow below with the name of the container
#    in the `containerDefinitions` section of the task definition.
#
# 4. Store an IAM user access key in GitHub Actions secrets named `AWS_ACCESS_KEY_ID` and `AWS_SECRET_ACCESS_KEY`.
#    See the documentation for each action used below for the recommended IAM policies for this IAM user,
#    and best practices on handling the access key credentials.
I just did what it saying to do and that was pretty much all the magic:
env:
  AWS_REGION: eu-north-1                             # set this to your preferred AWS region, e.g. us-west-1
  BE_ECR_REPOSITORY: release/backend                 # set this to your Amazon ECR repository name
  FE_ECR_REPOSITORY: release/frontend                # set this to your Amazon ECR repository name
  ECS_SERVICE: platform-service                      # set this to your Amazon ECS service name
  ECS_CLUSTER: lernado                               # set this to your Amazon ECS clustr,name
  ECS_TASK_DEFINITION: .aws/task-definition.json     # set this to the path to your Amazon ECS task definition file, e.g. .aws/task-definition.json
  BE_CONTAINER_NAME: backend                         # set this to the name of the container
  FE_CONTAINER_NAME: frontend                        # set this to the name of the container
The main problem for me was to make a mutual deployment of two images (frontend + backend) so I tweaked the config a little bit:
- name: Fill in the new backend image ID in the Amazon ECS task definition
  id: be-task-def
  uses: aws-actions/amazon-ecs-render-task-definition@v1
  with:
    task-definition: ${{ env.ECS_TASK_DEFINITION }}
    container-name: ${{ env.BE_CONTAINER_NAME }}
    image: ${{ steps.build-be-image.outputs.image }}

- name: Fill in the new frontend image ID in the Amazon ECS task definition
  id: fe-task-def
  uses: aws-actions/amazon-ecs-render-task-definition@v1
  with:
    task-definition: ${{ steps.be-task-def.outputs.task-definition }}
    container-name: ${{ env.FE_CONTAINER_NAME }}
    image: ${{ steps.build-fe-image.outputs.image }}

- name: Deploy Amazon ECS task definition
  uses: aws-actions/amazon-ecs-deploy-task-definition@v2
  with:
    task-definition: ${{ steps.fe-task-def.outputs.task-definition }}
    service: ${{ env.ECS_SERVICE }}
    cluster: ${{ env.ECS_CLUSTER }}
    wait-for-service-stability: true
I added the backend image to a new task definition and then reused the intermediate task definition to push the frontend images afterward. That’s fixed the issue of pushing mutual changes to the ECR. And…. After two days of tweaking, I built a fully working blazingly fast CI/CD workflow from scratch!!! The full version of the CD file you can find here: https://github.com/ExuCounter/lernado/blob/main/.github/workflows/cd.yml
Conclusion
I hope you enjoyed this topic and learned something new as I did! In the next article, we’ll start implementing the basic business logic on the backend.